Time Needed: Depends on the dent
Difficulty: Intermediate to pro
Cost: Zero to $150 or higher
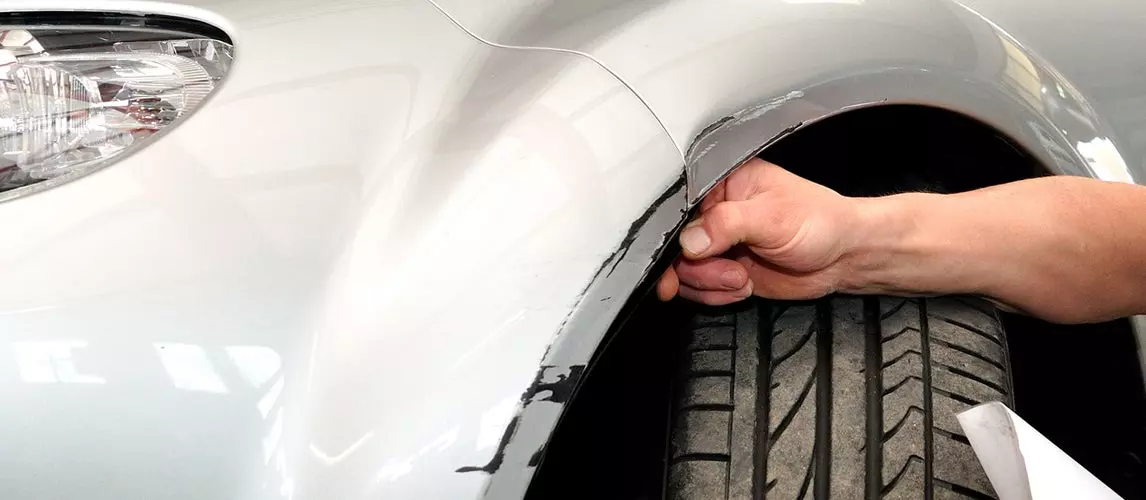
Even those of us who like a little bit of road rash or patina will agree that it’s worth attempting to get the dents out of a car. Something about a crinkled panel takes so much away from the overall appearance. Even if it’s something nobody else will notice, it’s the first thing your eyes drift to every time you glance at the car. There are professionals that specialize in removing dents, and it’s not a bad idea to get their help dealing with them if you’re not comfortable with this work and have high expectations. Everyone needs to start somewhere, though. It’s worth taking a crack at things yourself because you might save a couple bucks. That’s why I’m sharing tips on when and how you can approach dents by yourself.
Why Remove Dents Yourself?
It’s worth paying a professional if you’re after perfection and have little experience. Removing dents can be complicated work. It’s a painstaking process that takes hours to do right. Understanding how metal works and knowing where and how much pressure to apply distinguishes it as an art.
A dent is often much more than a singular low spot. There might be multiple dings or wrinkles in the impacted area, each with raised spots or crowns surrounding them. Getting in there and straightening out every last blemish takes a certain finesse. Either you need to invest time and effort into doing it right or simply pay a professional, since buying the tools might wash out any savings to be had by doing it yourself.
If you just want the big area taken care of and aren’t worried much about the little bits left behind or the panel is totally thrashed, there’s no reason not to tackle it yourself. Whether or not you should approach this yourself largely depends on your expectations and how much time and money you’re willing to invest.
What Types of Dents Are Worth Fixing Yourself?
Not all dents are repairable, and not all that are repairable can be fixed with simple tricks. Sometimes, a panel needs to be worked extensively to hopefully return it to its original form. That can mean leaving the paint intact; it can also mean removing the panel entirely for major cosmetic work. Professionals can easily identify the best approach by reading the dent and devising a specific plan.
Determining which kinds of dents are worth fixing on your own rests again on your comfort level and expectations. The processes listed below are tailored toward lighter dents that are typical to the daily beater, the kind that might appear from a light bump against the garage door or when Junior’s bike randomly strikes the fender. If you’re dealing with panels that look like a crushed pop can, you may want to consider alternatives or replace it altogether.
The Safety Brief
Removing dents isn’t a particularly dangerous task. Even so, you never know what’s going to happen when you’re dealing with automotive work. At the very least, wear protective gloves, especially if there are any rust or sharp edges. Also, throw on a set of safety glasses. You will look like a nerd, but you’ve only got one set of eyes, so it’s worth protecting them.
The Tools and Parts You’ll Need
- Boiling water and cold water
- Plunger/Suction-cup dent puller
- Hammer and dolly set
- Heat gun
- Dent-puller kit
- Rod set
- Line board light
- Knockdown tool
How to Pull Dents From Your Car
Boiling Water Method
Boiling water is an exceptionally handy way to straighten out plastic panels. It sometimes even works on small dents on thin sheet metal.
- Boil water. You can use whatever tickles your fancy to boil water. Most just use a pot, but a kettle can offer improved control.
- Pour boiled water on the dent. Slowly pour the water onto the point of impact and the affected area. Take your time; the goal is to gradually heat up the panel.
- Watch it pop out and lose your mind. You’ll either watch the dent pop right out or realize that this method doesn’t work in your situation. If the dent doesn’t release, you can try to push it out from the inside. The metal can be easier to persuade once it’s heated up. If this does work, follow it up with cold water to help the panel set properly.
Plunger Method
The plunger method works for large dents. Before you grab that nasty plunger from behind the porcelain throne, know that suction-cup dent pullers are widely available at many discount stores and work far better.
- Add some water to help promote a seal. Your friend, boiling water, is back again. Pour it on slowly and prepare for the next step.
- Apply suction to the panel. If you’re using a normal plunger, you don’t need to flow through the next few steps in a single motion. Instead, press the plunger with just enough force to get it to create suction. With a suction cup-style dent puller, things are a lot less complicated. Simply set the tool on the panel and follow the manufacturer’s procedure to create a seal.
- Pull away quickly. The final step is simple. Just give it a pull. Brace yourself, though. The plunger can break free and cause a few extra dents if you’re not careful. You may get lucky and remove the majority of the dent on your first shot. It will probably take multiple tries, though.
Hammer and Dolly
The first thing you might think to do is grab a hammer and smack the dent from the inside to pop it out. Don’t do that. Instead, brace the rear of the panel with a dolly and strike the painted surface with the hammer. Fair warning: You can easily damage the paint if you’re not careful or don’t use the right tools.
- Access the other side of the panel. This is the part where you say that’s a lot easier said than done, and you’re not wrong. However, this option is best when the backside of the panel is easily accessible or if you can remove it from the car entirely.
- Apply light heat. Use your heat gun to heat up the panel slightly. The goal here is to keep the paint soft at high-stress areas to prevent cracking as the dent is removed.
- Place the dolly behind the lowest point of the dent. For the initial steps, you want to use the hammer-off-dolly technique. Apply pressure to the lowest point of the dent while using a hammer to tap down the high spots surrounding the impacted area.
- Gently strike the exterior of the panel. Using a polished hammer, lightly tap the high spots surrounding the dent. Don’t try to knock them flat in one blow. Tap the panel, letting the weight of the hammer do most of the work. This is a slow process, but patience is the key.
- Continue to work the outer edges until you reach the point of impact. Make the affected area smaller, honing in on the point of impact. Once you reach it, continue to use the same light blows to work it free.
- Iron out the panel. Once the majority of the dent has been removed, you want to use the hammer-on-dolly technique to smooth things out. Identify small areas that need work, place the dolly behind them, and gently tap them flat. It helps to use a repair light to make this process go more quickly.
Hot Glue Technique
The hot glue technique is one of the simplest and most effective methods used for removing dents from panels. You will see it commonly used to remove small dings, but the right kits can be used for larger dents.
- Set up your lighting or reference board. Your kit may or may not come with a repair light or reference board. This is attached to the panel and angled in such a way to make the dent easier to see and ensure you can address all of the high and low spots.
- Prepare the paint. You need clean paint for the glue to adhere. Take a minute to wipe the affected area with some grease remover before proceeding.
- Pick a tab. Your kit should come with multiple tabs or buttons. You want to find one that fits just perfectly into the low spot.
- Apply a tab or button to the dent. Once you have the right tab, apply glue to it and let it dry. Be sure to give it enough time to set up before you pull. Otherwise, it will break free when pressure is applied.
- Use a device to pull the dent from the panel. The kit might have a slide hammer or pulling device. Which you use ultimately depends on preference or what you have to work with. In either case, refer to the instructions for the necessary method to pull the dent out. Remember, you’re still trying to gradually work the dent out rather than eliminate it in one quick burst.
- Remove glue. Once you’re done pulling, you will need to remove the button and glue. Alcohol solutions are used for this, along with the paint-safe scraper in your kit.
- Address crowns. After the dent is removed, knock down the crowns surrounding the low spot. Use your reference board and the proper knockdown tool to work through these. Place the tip of the tool on the high spots and use gentle taps with the hammer to tap them down.
- Repeat until the dent is removed. You will likely need to repeat the process of working through smaller buttons as the dent shrinks. It’s all about patience. Give the process as much time as it needs for you to remove the dent entirely.
Leverage Method
There’s some controversy over whether pushing or pulling methods are better for smaller dents. Knowing which is better is based on the specific dent. If you can only afford one kit, some feel pushing is the best place to start.
- Access the other side of the panel. Pushing the dent requires access to both sides of the panel. The rods used for this are thin, though. You don’t need to worry about creating a crazy amount of space, just enough room to use the rod effectively.
- Secure the panel. If you’re working on a moving panel, such as a door or the hood, you will need to brace it. Some kits come with provisions for this, but a nylon-coated wire will work in a pinch.
- Establish leverage. Repair rods use leverage to get the job done. That means you will need to set up a fulcrum. A block of wood or something else soft is often used for this. If there is a natural point to work off in the car, cover it with a microfiber towel to prevent damage.
- Set up your lighting. Establishing a good reference point is essential to the effectiveness of this procedure. Attach the repair reference board or lighting so that it casts a reflection over the dent.
- Locate the tip of the tool in your panel. Place the tip of the tool behind the panel with light pressure. Watch the reflection to see where the tool is causing the panel to distort. This is how you track the tool’s location to apply pressure in key areas.
- Lightly press the dent out. Once you locate the tool on the affected area, begin applying light pressure with rocking motions. It’s important to work around the low spot by applying pressure in several locations to work it out effectively. Again, you’re working the dent out, not removing it as quickly as possible.
- Knock down crowns. After a few pushes, it’s time to knock down the high spots with the knockdown tool. This relieves stress, making it easier to push the remainder of the dent out and make sure the panel is straight.
- Repeat until the dent is removed. You will need to repeat steps a few times until the dent is completely removed. Perfectionists may use wet sanding to scuff the paint toward the end to make it easier to see small imperfections, but that’s optional.
Video on Removing Dents from Cars
Removing dents isn’t as simple as it seems. It’s also not rocket science. It just takes a little bit of experience and an understanding of how metal reacts to your efforts. Do the research and get a feel for the process before you try your hand at it. The video below goes through the steps of dent repair with pushing tools. It’s certainly not the only metal-working video you should watch, but it does a great job of demonstrating the process and explaining many of the nuances you need to be aware of for this to work.
FAQs
Car Autance answers all your burning questions.
That ultimately depends on your coverage, but your insurance may cover dents. Whether it’s worth taking advantage of is up for debate. Having your insurance cover the repair of a dent can raise your premium, making it a less cost-effective solution than paying for it out of pocket.
That’s up to you. If you can live with some minor blemishes, then why go through the trouble? If, however, you’re a perfectionist or are interested in protecting resale value, you will need to deal with even the smallest dents.
Yes, which is why you want to follow the right steps and use the proper tools. If you’re not careful, you can easily chip, scratch, or crack the paint when removing dents. It’s worth noting that some dent repair processes require the paint to be removed entirely, which you may need to prepare for in extreme cases.
Disclosure: Carbibles.com is also a participant in the Amazon Services LLC Associate Programs, an affiliate advertising program designed to provide a means for sites to earn advertising fees by advertising and linking to Amazon.com. Pages on this site may include affiliate links to Amazon and its affiliate sites on which the owner of this website will make a referral commission.