
Time Needed: 1-2 Hours, Difficulty: Intermediate, Cost: $75-$100
In today’s high-tech world, it seems as though you can’t so much as mention a carburetor without someone chiming in and explaining the wonders of electronic fuel injection (EFI). “Why would you rebuild a carburetor when you can just take it off and install fuel injection?” the chorus sings. If you say you’re sticking with the carb, the opposing side reacts as if you’ve sent a Superbird off to the crusher.
But the fact is that not everybody wants the technological wonder that is EFI. We’re all on board with the idea that it is the superior fuel delivery method for a variety of reasons. However, until they’re banned from use, some people still want to stick with a carburetor, and that’s perfectly okay! It can be on account of working within a budget, keeping things period-correct, or personal preference. It’s your car, so it’s your choice.
If you’re one of these people who plan to drive a car with the carburetor, it’s important to know you’re going to have to work on it. In particular, if you’re buying a used car or rolling out that barn find for the first time, chances are a rebuild is in order.
Today, Carbibles’ band of wizards are diving into just that. Follow along as we take a look at the crusty Holley 4150 Double-Pumper off of my 1969 Dodge Charger Project Car and discuss the basic principles of rebuilding a carburetor that can carry over to virtually any other vehicle.
The Safety Brief for Rebuilding Carburetors
Rebuilding a carburetor isn’t just rebuilding a carburetor. You’re going to spend some time under the hood of the car and around some harsh chemicals, so you’ll want to flex those brain muscles fairly often throughout. Otherwise, you might mash a few fingers, accidentally catch hazardous fumes, or possibly light yourself on fire.
To protect yourself, you’ll want to make sure you have a good supply of protective gloves on hand, as well as some safety glasses. Any time you’re under the hood, just be careful of hand placement, particularly when the time comes to make adjustments with the car running.
keep in mind that you’ll be around plenty of gasoline and cleaners that’ll leave you with a pretty good headrush if you don’t open a few windows while you work. You will also want to avoid all open flames or other sources of heat and spark minimum while you work.
The Tools & Parts You Need to Rebuild Your Carburetor
The 4150 uses a pretty basic setup, and you don’t need much to tear one down. A simple set of screwdrivers, wrenches, pliers, and an oil drain pan will get you by. I will admit that I’m doing this the fast and dirty way, though. If you want to do it by the book, you’ll want a few other tools for the job.
Tools specific to Holley carburetors include a proper jet removal tool in place of a flat head screwdriver and a power valve removal tool instead of an adjustable wrench. You’ll likely get by just fine without them, but there is such a thing as the right tool for the job. In this case, they ensure you won’t damage critical components of the carburetor.
On top of basic hand tools, you’ll want to pick up a carburetor rebuild kit specific to your carburetor, plenty of carb cleaner, shop towels, and brass-bristle brushes—we dive further into cleaning in a separate title dedicated to the process of cleaning a carburetor. Luckily, Holley makes life easy as they offer rebuild kits that come with almost everything you’ll need to rebuild any of its carbs.
Before you run off to the parts store, try to keep a few things in mind. One, these kits only come with two sets of the more commonly used power valves. Two, it doesn’t include any jets or discharge nozzles. And three, there are no main well plugs in the kit either. Therefore, you might want to do some planning ahead to consider any other parts you might want as you tear into your carb. There’s no better time to make changes than when the carb is already apart anyway.
The Job: How To Rebuild Your Carburetor
First things first, get any time frame out of your head. You can make plenty of mistakes when rebuilding a carb that’ll set you back to square one or worse. To quote Joe Pesci in My Cousin Vinny, “It’s a procedure. … Supposing you skip the first step, and while you’re replacing one of the jets, you accidentally drop the jet, it goes down the carburetor, rolls along the manifold, and goes into the head. You’re @$#%&!.” So, take a deep breath, collect yourself, and prepare for the procedure without rushing.
1. Review the Rebuild Kit
Any technical task starts with reading the instructions. In this case, it’s reviewing the carburetor rebuild kit. Again, Holley kits come with everything you’ll need to run through any of its carbs. You’ll want to open it up, review the instructions, and set aside all the components you’ll need for your particular Holley carburetor. Again, now is an excellent time to think about anything else you might update, like the power valves, jets, discharge nozzles, floats, etc., and prepare them as well.
2. Remove Carb from Manifold
This step is pretty self-explanatory. Go ahead and disconnect any lines, hoses, or linkages to the carb and remove it from the intake manifold. Be ready with a rag or catch can when disconnecting the fuel line. Gas will pour out and you want to contain the mess. Set the carburetor in an oil drain pan and stuff some clean rags right in the hole left behind. Make sure you block off the intake before you try and put the mounting hardware back in place. I’ve made the mistake of dropping nuts in the intake, and the rag makes sure they won’t go far while also protecting from dust and dirt.
3. Empty Fuel from the Carburetor
With the carburetor in the drain pan, start cycling the throttle lever. Doing so will push most of the fuel in the float bowl through the accelerator pump and out the discharge nozzles. It’ll take a few cycles, but it’s a little more controlled than just tearing the fuel bowl off and letting fuel poor out.
4. Inspect the Carburetor
I know I said that you’d want to think ahead, but now’s another opportunity to inspect the carburetor. Keep an eye out for any signs of excessive damage to any of the external components. If the linkages are shot, the hardware is stripped, or any other issues are present, you’ll want to address them throughout the procedure. You might also want to take a minute to deal with any excess gunk at this point as well. Simply hit any excessive grease with some carb cleaner and a brass brush at this point. It doesn’t have to be perfect, but dealing with it now reduces the amount of work you’ll have to do later.
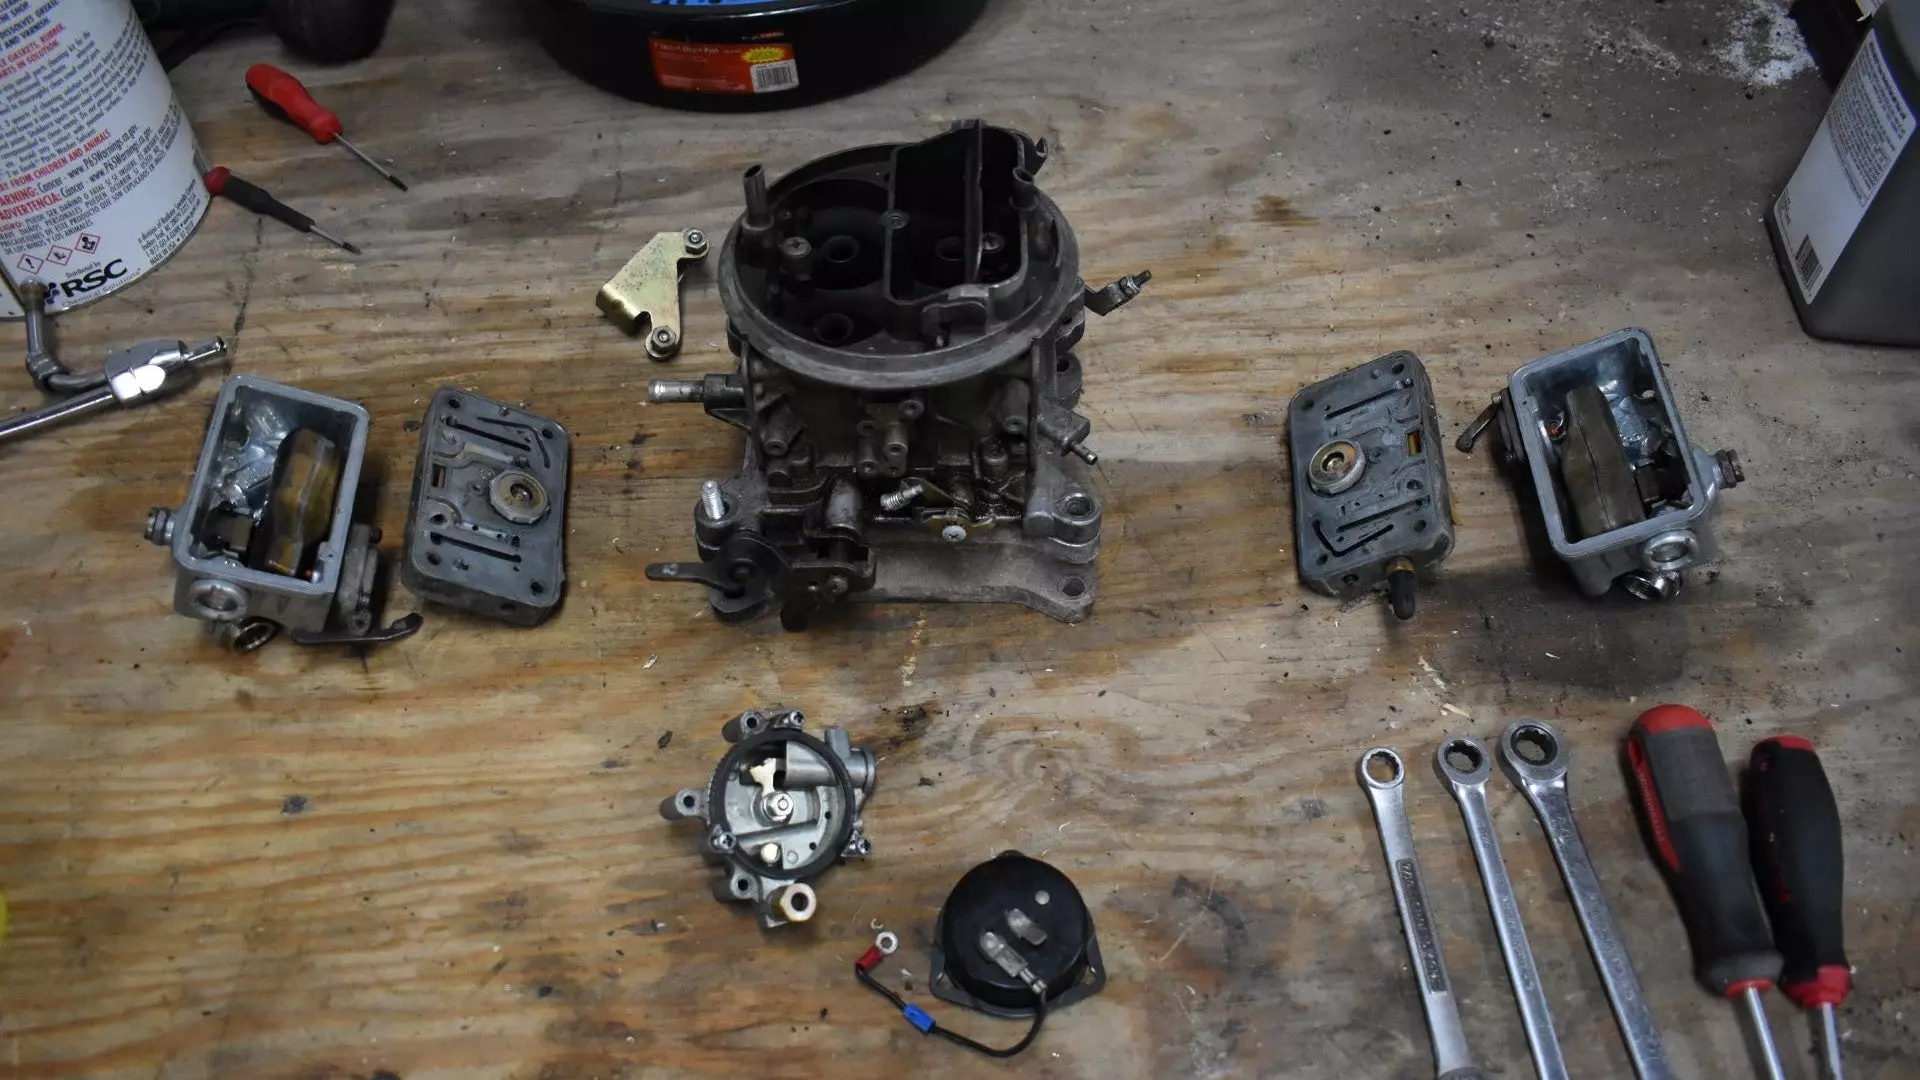
5. Disassemble the carb
Now that the carb is empty, you can start to disassemble it. As you do, it’s best to keep track of all the loose nuts and bolts as you work. How you do so is up to you, but I suggest at least having the lid from an old container to keep them from rolling under anything else that’s occupying the chaotic surface of your workbench. Taking a picture of the setup before disassembly might also help when putting it all back together.
There aren’t many small parts or pieces of trickery inside of this model of carb, but there is a check needle that lives beneath the discharge nozzles. It’s very easy to forget about and lose. In other models you might see tiny check metal balls. This serves as an excellent example as to why you want to make sure you keep a clear head and take your time with this job.
6. Take Notes
During disassembly, you want to note the size of the jets, the discharge nozzles, the power valves, and their locations. In this case, the primary and secondary sides are essentially mirror images of one another, but that’s not always the case. If you’re working with a vacuum secondary carb, the primary side is different from the secondary in that there is no power valve or nozzle on the secondary end, but you’ll still want to keep track of your parts. Snack-size baggies and a Sharpie are your friends.
7. Give the Baseplate a Good Once Over
The baseplate is essentially the business end of your carburetor, but it’s really easy to overlook inspection during a rebuild. With the carb in pieces, take a minute to look over each part and make sure it’s all in working order and there is no visible damage. You might also want to make sure there’s no play when cycling the throttle linkage to ensure the bushings are in good shape. If it’s busted, you can just order a new baseplate that’s ready to roll.
8. Clean Each Part Thoroughly
Again, we’re going to dive into cleaning carburetors in another passage. However, you want to take this step seriously. Go through and make sure every surface and port on or in the various components are as clean as possible. Pay close attention to any old gasket material or adhesive left on the carb, and clean it with a screwdriver or safety blade if necessary. Otherwise, the new gaskets and parts won’t function like they need to.
9. Begin Assembly
Now that the carburetor is clean, you can go ahead and start assembling the carb with all the new gaskets and components. To be frank, this is where all of your homework pays off, as everything will fall right into place. Just match your gaskets, ensure you replace all components, and don’t go nuts tightening things up—you are dealing with aluminum, and the threads strip easily.
10. Make Sure You Have a Smooth Cycle
Before going any further, run the carburetor through the throttle cycle a few times. All you’re doing here is pulling the throttle lever to open the throttle blades all the way to replicate the motion created by depressing the gas pedal in the car. In doing so, you’re making sure nothing is binding up. In my case, the newly installed secondary throttle speed screw needed to be cut down a bit to fit behind the choke—better to deal with these issues now than later.
11. Set Idle Circuit to Factory Spec
It’s good to get your idle circuit inline before you install the carb on the engine. You can refer to what the manufacturer recommends for your model of carburetor. This way, you can monitor the throttle blades’ positioning to ensure no more than .030″ of the transfer slot is exposed. You will need to make more adjustments after installation, but doing this now ensures you have a good baseline to work with.
12. Install Carburetor on Engine
That’s it. The carb is rebuilt. Now, all you have to do is set it back on the car. But there are a few things to address before you zip off on your merry way.
13. Fill Fuel Bowls
Turn the key on to activate the fuel pump or cycle the engine until your fuel bowls are filled. Before firing the engine, take a minute to inspect for any fuel leaks that may be present. This is also an excellent point to check fuel levels in the bowls and adjust accordingly.
On these Holley carburetors, adjusting the floats starts by removing the fuel bowl site plugs and cracking the lock screw on top of the needle and seat. From there, you manipulate the adjustment nut that is responsible for the needle and seat’s position, allowing the floats to rise to different heights. Clockwise rotation of the nut lowers the fuel level and counterclockwise raises it. Keep in mind that fuel is likely to leak from the adjustment screw during this process.
The goal is to have the fuel levels just at the very bottom of the site hole. I suggest upgrading to fuel bowls with a sight glass built into the side as it makes the process much easier, and there’s less spilled fuel.
14. Set Accelerator Pumps
When the fuel bowls are filled, so are your accelerator pumps. At this point, you’ll want to make sure that your accelerator pump arms are correctly adjusted. You might monkey with this once the car is running, but getting it in order now ensures you won’t be puking fuel at idle.
15. Tune and Enjoy
All that’s left is to fire the car up, dial in your settings, and enjoy yourself.
Your Questions, Our Answers on Rebuilding Carbs
Of course you’ve got questions! Carbibles has answers!
Q: Is it better to rebuild or replace a carburetor?
A: That’s kind of a trick question. It ultimately depends on your budget and goals. In the case that you’re looking to improve performance or efficiency, you might be better off replacing the carburetor altogether or even upgrading to fuel injection.
A replacement might be necessary if you’re making performance modifications to the rest of the engine or looking for something that can offer what the carburetor you have cannot. However, if you’re content with the carburetor’s performance, a rebuild is undoubtedly the best choice. Not only because it’s going to preserve the engine’s characteristics, but because it’s the far more affordable option.
Q: How often should a carburetor be rebuilt?
A: A carburetor can go as long as 100,000 miles on a daily driver before it needs to be rebuilt. However, that’s just an estimate. You’ll want to keep an eye out for issues with backfiring, poor running conditions, smoke in the exhaust, or just flat-out lousy performance to determine if the carburetor needs to be rebuilt. Also, cars that sit for long periods may require carb rebuilds more frequently because today’s gas is anything but friendly when dormant.
Q: How much does it cost to rebuild a carburetor?
A: The cost of a carburetor rebuild can vary greatly. A basic rebuild will probably cost about $75-$100 between the rebuild kit and cleaners. If you’re upgrading parts and making significant updates, you might be looking at about $200 or more. It ultimately depends on the specifics of what your carburetor needs.
Video Tutorial on How To Rebuilt a Carburetor
We get it. Carb rebuilding can be a topic that’s hard to follow if you’ve never done it before. Not only that, we’re all visual learners. Luckily, there’s no shortage of carburetor rebuild tutorials on the web. This one, in particular, keeps it short and sweet!
Best Places To Buy Tools and Parts to Rebuilt a Carburetor?
We know that you’ve already got enough on your plate when it comes to tackling your first carburetor rebuild. The last thing you need to do is set off with a laundry list of parts and tools to track down. We’ve got you covered there, too!
We don’t know what’s in your toolbox, but we do know what tools you’ll want on hand. The Gearwrench 9317 7-Piece Ratcheting SAE Wrench Set, Craftsmen 12-Piece Assorted Screwdriver Set, and Neiko 4-Piece Needle Nose Plier set will cover the basics. If you’re tackling a Holley Carburetor, you’ll also want to pick up the Holley HOL 37-119 Carburetor Renew Kit, Proform 67469 Carburetor Jet Installation Tool, and this JEGS 150222 Power Valve Tool.
Disclosure: Carbibles.com is also a participant in the Amazon Services LLC Associate Programs, an affiliate advertising program designed to provide a means for sites to earn advertising fees by advertising and linking to Amazon.com. Pages on this site may include affiliate links to Amazon and its affiliate sites on which the owner of this website will make a referral commission.